I hear it all the time. I would love to be creative but I can't draw.
The truth is, if you can write, you can draw. You have the hand eye co-ordination right there.
You have the cognitive skills to draw, to take an idea and put it down on paper.
The only thing you lack is practice and a few lessons to point you in the right direction. If you really want to, you can do it.
Before the advent of photography, artists and artisans recorded the world around them by drawing and painting. People were trained in apprenticeships in the same way you might have become a blacksmith, a shoemaker, a farmer or any other profession. In the same way, you can learn to draw. It is not a skill you are born with.
So, if you want to start drawing, here are some simple exercises to get you started.
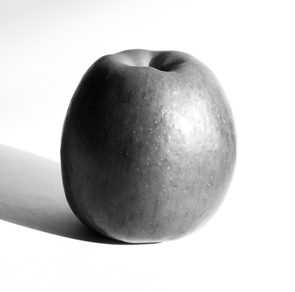

1. When a child learns to write, they often start by going over a series of dots so they learn the way the shape is formed, the way to use their implement. Now, I'm not suggesting you go and find a book of dot to dots, but how about this. Print up a photograph of an object, something simple like an apple or a vase, in black and white. Draw around the contours of the object. Don't put any shading in at this stage. Just get the feel for the movements you need to make to draw that object. Use different materials to see which you get on with best - try fine-liners, biros, pencils, pastels.

2. This time, using the same photograph, draw the object freehand on a clean piece of paper. Draw it the same size and with the material you found you got on with best. If it helps, draw a grid on the photo and a matching one on the paper dividing the space into 4. Look closely at where the object intersects the grid and it's relationship to the edges of the picture. Repeat until you need to concentrate less and feel comfortable with the movements. This is like learning to drive. You need to make the movements second nature, like turning the wheel of your car to go in the right direction.

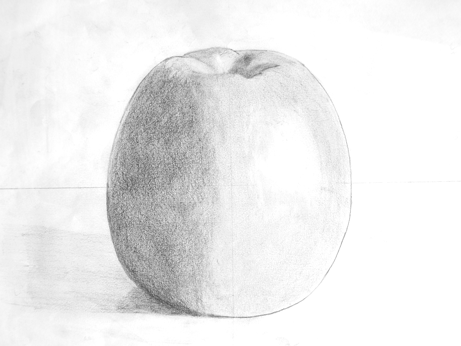
3. The next stage is a very big step. We now want to add just a little bit of shading to give our outline some dimension. Go back to your photo with it's drawn on outline. Now look for the brightest area, the highlight and outline this very lightly. Shade very lightly everywhere outside of your highlight area(s). I use the side of the pencil tip, colouring in one direction for one layer and at right angles for the next

Now look for the very darkest parts. Outline these and shade them in. You will be working over your previous shading. Try to go in 2 more directions so you fill in all the tiny holes. Don't forget to look underneath your object for any area of shadow there. Now do this on your blank paper drawing. This stage is like learning to change gear. You will have to think about what you are doing for quite some time, but it will eventually become second nature. Once you have finished this stage, you can blend the surface to create gradual tones. I use my pinky finger when practising but would use a torchon for work to keep.
On this version, I don't like the lighter streak in the dark area on the left, so I will tidy the drawing up by evening out the tone across the picture. I wanted you to see this though, as it demonstrates that less can be more and simplification helps the drawing.
This is the tidied up version. I won't do any more to this as it was completed on A4 copy printer paper which doesn't stand up to much treatment. It demonstrates however that you don't need to spend a fortune just to get drawing.
I hope you will have a go at this and I would love to see your efforts. Happy drawing, Janice x